Windows 核心安装
| 安装指南 | |
| 本文是《安装指南》的一部分。您可以单独阅读它,也可以单击上一个链接以在步骤之间轻松移动。 | |
| << Step 1: 安装要求 | Step 3: 服务器设置 >> |
所需软件
在继续之前,请参阅安装要求
拉取和编译源代码
提取代码
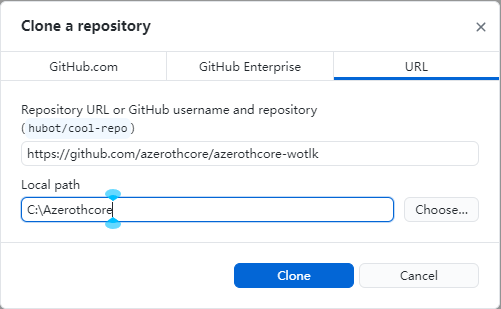
- 创建源文件所在的目录。在本指南中,我们将使用 C:\Azerothcore.
- 打开 Github Desktop
- 在左上角依次点击 File → Clone repository…
- 点击 URL
- 按如下方式填写数据:
Repository URL or GitHub username and repository: https://github.com/azerothcore/azerothcore-wotlk
Local path: C:\Azerothcore
点击 Clone. 几分钟后, Azerothcore 的源代码将被克隆到 C:\Azerothcore.
使用 CMake 配置和生成 Visual C++ 解决方案
在开始之前,请创建一个名为 Build 的新目录。在本指南中,我们将使用 C:\Build.
- 打开 CMake
- 点击 Browse Source… → 选择源代码所在的文件夹 (C:\Azerothcore)
- 点击 Browse Build… → 选择构建目录 (C:\Build)
- 点击 Configure.
- In the dropdown menu, choose the version of the compiler you downloaded in the Requirements section. Be sure to choose the Win64 version if you work on a 64-bit compilation.
- Make sure that Use default native compilers is checked.
- Click Finish.
- Make sure TOOLS_BUILD is set to all. This will compile the extractors needed later in the setup.
- Click Configure again. As long as you have error(s) typed in red in the log window you will need to check your parameters and re-run it.
- Click Generate. This will install the selected build files into your C:\Build folder.
Some error fixes
If you were to encounter errors in CMake see Common Errors.
Compiling the Source
In CMake press Open Project to open the AzerothCore.sln file directly with Visual Studio.
In the menu at the top, click Build and select Configuration Manager.
Set Active Solution Configuration to RelWithDebInfo.
In the list menus below “Help”, set Active Solution Platform to x64 and then click Close (settings automatically save).
If you set 32-bit compilation during CMake configuration, select x86. Right-click ALL_BUILD in the Solution Explorer on the right sidebar and select Clean.
Right-click ALL_BUILD and select Build. (Ctrl + Shift + B)
If your GUI does not show Solution Explorer, click the Build menu and select Clean Solution, and then Build. Build time differs from machine to machine, but you can expect it to take between 5 and 30 minutes.
If you are asked to “Reload build files” during or after the compilation, do so.
When the build is complete you will find a message in the output that looks similar to this:
========== Build: 22 succeeded, 0 failed, 0 up-to-date, 1 skipped ==========
You will find your freshly compiled binaries in the C:\Build\bin\RelWithDebInfo or C:\Build\bin\Debug folder. These are all used to run your server at the end of this instruction.
You will need the following files in order for the core to function properly:
\configs\
authserver.exe
authserver.pbd
worldserver.exe
worldserver.pdb
libmysql.dll

---------
For OpenSSL 1.1.x
libeay32.dll / libcrypto-1_1.dll / libcrypto-1_1-x64.dll
ssleay32.dll / libssl-1_1.dll / libssl-1_1-x64.dll

---------
For OpenSSL 3.0 and later

legacy.dll
libcrypto-3.dll / libcrypto-3-x64.dll
libssl-3.dll / libssl-3-x64.dll
In the configs folder you should find:
authserver.conf.dist
worldserver.conf.dist
There are two/three DLL files that need to be manually added to this folder, and you need to copy them from the following installation/bin directories:
libmysql.dll → C:\Program Files\MySQL\MySQL Server 8.x\lib\
Note: You need the exact version of libmysql to correspond to the MySQL you have downloaded. Due to this you cannot download the DLL from the web and need to take it out of the folder.
OpenSSL before version 1.1.0: libeay32.dll and ssleay32.dll → C:\OpenSSL-Win64\ or C:\OpenSSL-Win32\ (depends on if your core is 64-bit or 32-bit).
OpenSSL 1.1.x names have changed: libssl-1_1-x64.dll and libcrypto-1_1-x64.dll → C:\OpenSSL-Win64\bin
OpenSSL 3.0 and more recent installed, you need to copy: legacy.dll → C:\OpenSSL-Win(32/64)\bin
libcrypto-3-x64.dll and libssl-3-x64.dll → C:\OpenSSL-Win64\bin
About compilation log and report pdb files only exist if you compile with Debug or RelWithDebInfo configuration. It is not mandatory but it is recommended to compile core with at least the RelWithDebInfo configuration to get proper crash logs.
To report crash logs it's MANDATORY to compile with Debug or RelWithDebInfo configuration.