| Boost ≥ 1.78 |
| MySQL ≥ 5.7.0 (推荐版本: ≥ 8.0) |
| OpenSSL ≥ 3.0.x |
| CMake ≥ 3.16 |
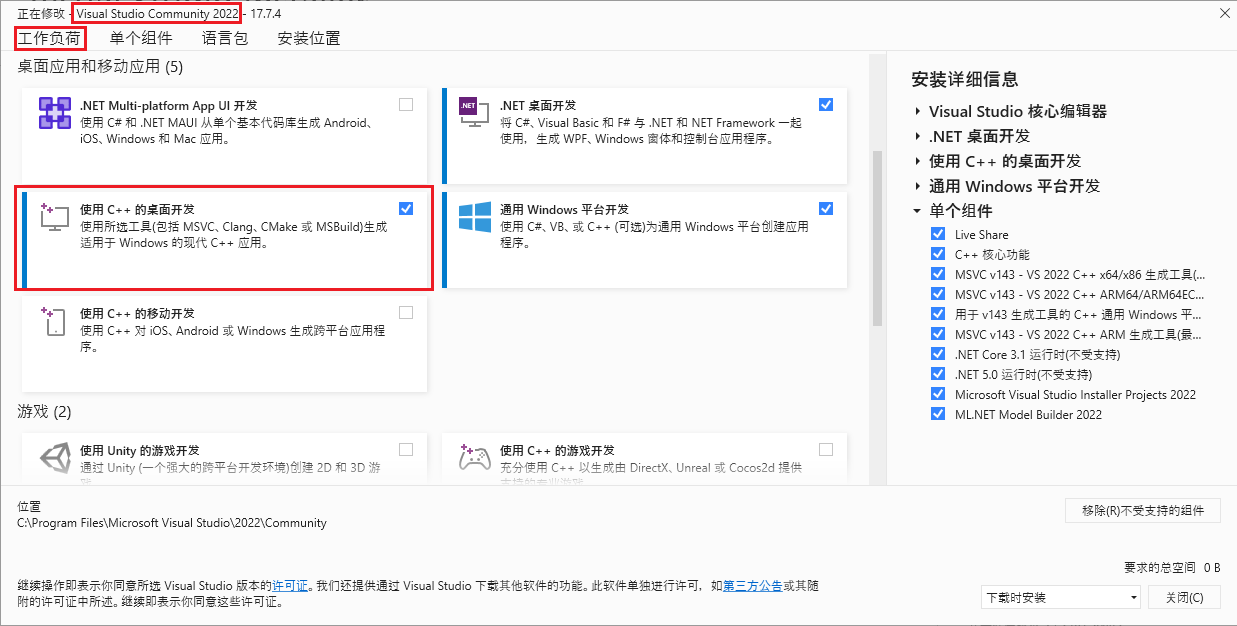
| MS Visual Studio (Community) ≥ 17 (2022) (Desktop) (No preview) |
-
下载独立安装程序
-
下载安装程序并按照步骤进行设置。
-
-
下载 Windows MSI 安装程序。
向下滚动到底部,然后单击 “No thanks, just take me to the downloads!”
安装快完成时,确保选中“启动MySQL实例配置向导”,然后单击“完成”。
当MySQL实例配置向导启动时,大多数默认选项都可以,但请记住您使用的用户名和密码 (root // whatever). 。您将需要它们登录到您选择的数据库管理工具(如下),以便稍后导入SQL文件。
要测试MySQL是否正确设置,请在键盘上按CTRL + ALT + DEL,进入任务管理器,然后选择“服务”选项卡。在服务列表中,您应该看到状态为“正在运行”的“MySQL”。
将 MySQL 添加到环境变量。
选择数据库管理工具
MySQL cli (Fastest)
SQLYog Community Edition
HeidiSQL (Best for beginners)
MySQL Workbench (already installed if you chose to install the full MySQL package)
DBeaver (Multiplatform Database Management Tool)
Try connecting to your database. You may be looking for “Connect to Host”, “New Connection” or “Session Manager” depending on which program you use.
Create a new connection/session. The Hostname/IP address of “127.0.0.1” or “localhost” is fine if you installed MySQL on the same computer that you installed HeidiSQL or SQLYog. Simply fill in your root // whatever password and you should now be able to connect to your database.
-
Download and install the Latest Release windows-x86_64.msi file, NEVER the RC (Release Candidate) versions.
We recommend to compile in 64 bits mode.
MySQL development files
-
Find the 64-bit version by finding the latest 3.0.x Win64 OpenSSL that is NOT the “light” version. (Example: Win64 OpenSSL v3.0.7)
Note #1: If you get a “Missing Microsoft Visual C++ …. Redistributable” error message while installing OpenSSL, Download the Microsoft Visual C++ 2017/2019/2022 Redistributable Package (x64) (Direct Download) (1.7MB Installer) and install it.
Note #2: While installing OpenSSL, choose The OpenSSL binaries (/bin) directory (NOT “The Windows system directory”) when given the choice of where to copy the OpenSSL DLLs. These DLLs will need to be located easily for Core Installation.
-
Download the prebuilt Windows Binary for Visual Studio 2022
64bit
Add an environment variable to the “System” variable named “BOOST_ROOT” and with the value being your Boost installation directory, e.g. C:/local/boost_1_81_0. Important is to use '/', not '\' when pointing to the directory. (Make sure that it does not have a trailing slash (end of the path). If you still get problems, add the same variable in the USER variables section too, as shown in the image below.)
Notice that this image shows the version number 1.72.0 - use your actual version number in your settings.